Side Dishes

Oven Roasted Broccolini Recipe

Looking to try an easy, delish new vegetable side dish with dinner tonight?

I’ve got a yummy idea for you: Oven Roasted Broccolini!  

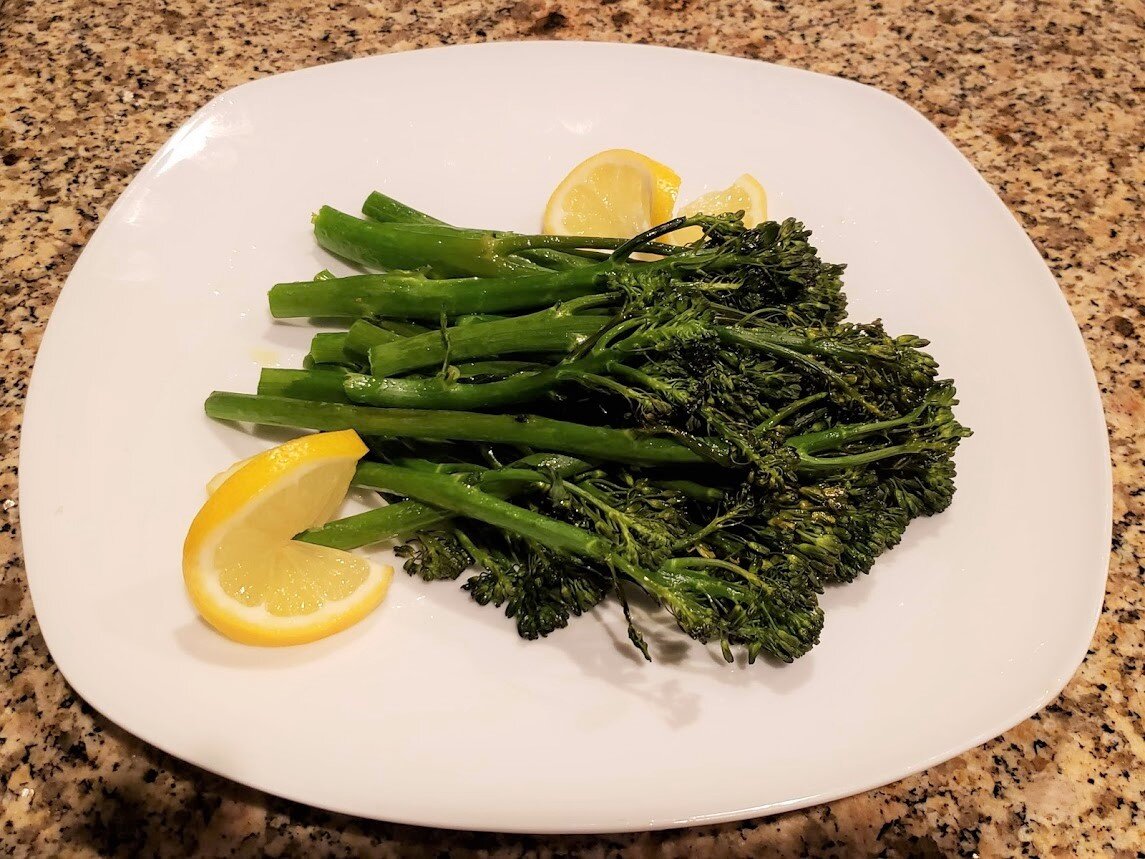
broccolini finished.jpg

I’m sharing this one with you to simplify your family’s dinner tonight.

It’s hard enough to follow a clean eating lifestyle these days, trying to think of healthy sides, night after night. So this one is about way more than the tasty side dish, created with very little effort.

(Though the fact that this recipe takes only 15 minutes is a fun plus!) 

It’s that this shiny green veggie is so dang good for us!

The nutritional benefits of Broccolini are numerous, with it ranking high for both Vitamins C & A (both of which are super important for strengthening our immune system, helping our bodies in fighting off both virus-caused sickness and the common cold!) So important that we’re intentionally eating for immunity! Now, more than ever.

Oh and hey, did you know that getting enough Vitamin C through your foods is a great way to boost your body’s absorption of iron? (No? Ok, to be real, I didn’t either until I was researching for this post!) This is a really beneficial thing for all of us, but especially for those of us eating plant-based - as we’re possibly getting less iron into our bodies!

Here’s how to easily make it...

Oven Roasted Broccolini

Take 1 Bunch Broccolini (per 2-3 eaters) and wash, shake off water, and trim off about an inch from the end of the stalks.

Set the oven to 425 degrees and prepare a large cookie pan by lining with aluminum foil for easy cleanup.

broccolini on pan.jpg

Lay the Broccolini stalks around the pan, then drizzle generously with olive oil (may use your hands to mix the oil evenly into stalks) and grind fresh black pepper and pink salt over it.

Bake for around 10-15 minutes, or until crispy and browning on edges.


This is the “base recipe,” but you can always change it up, and add one of these fun variations on flavor:

  • 2 Tablespoons grated Parmesan cheese

  • Squeeze a half to whole fresh lemon over the Broccolini (to taste)

  • Mince 3-4 fresh cloves of garlic and sprinkle over it before baking

  • 1 Sprinkle of preferred Chili powder, chili flakes, or small smear of chili paste mixed in well

  • Sprinkle handful shredded sharp cheddar cheese over it in final 3-5 minutes of baking

Well, are you inspired to try this easy, peasy recipe for dinner this week?

Looking for more recipes and ideas for clean, healthy living for your busy family? Join the conversation in our community!

Easy Carrot Salad

Carrots have numerous nutritional benefits, as they are packed full of sugar-balancing through researching ways to balance blood sugar through diet and naturally reverse autoimmune disorders…I’m learning even more about the incredible benefits they are full of!

  • Because of the complex carbs and type of fiber they contain, they help our bodies balance our blood sugar - especially when enjoyed raw, like in this recipe.

  • They are full of beta-carotene (the vitamin that gives them their gorgeous color) AND alpha-carotene, and we need these 2 antioxidant-rich substances to help our body make vitamin A for healthy skin and mucus membranes, boost our immune system, and give us good eye health and vision.

  • The antioxidant load in carrots is high, and a necessary nutrient our body needs to help itself remove free radicals and unstable molecules, two of the “oxidants” that contribute to cancer, inflammation and compromised immunity. Carrots literally help our body “flush” them out!

I won’t bore you with more details on the power of these amazing root veggies - but hopefully you’ll get to making this delicious recipe to bump up your carrot intake.

Your body will thank you!

carrot salad final.jpg

Ingredients

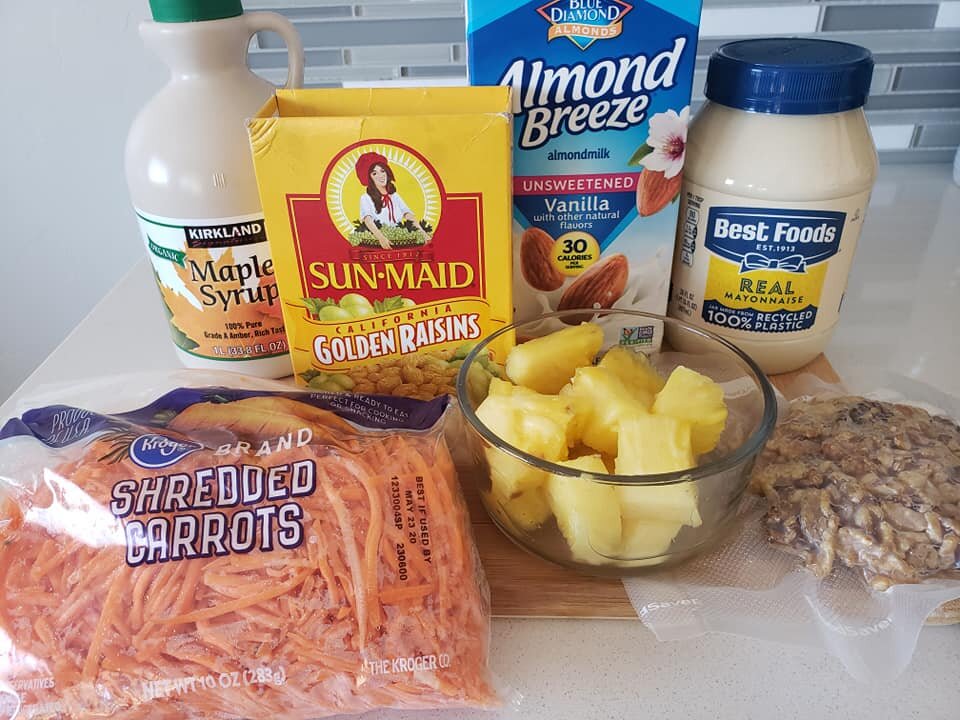
  • 1 - 10 oz. bag shredded carrots

  • 1/3 cup raisins, dried cranberries or golden raisins

  • 1/2 cup medium-diced fresh pineapple (or canned, if you don’t have fresh)

  • 1/2 cup walnuts, chopped into small chunks

Sauce:

  • 1/2 cup unsweetened almond milk

  • 1/4 cup mayo

  • 1 teaspoon (packet) of Stevia or a drizzle of pure maple syrup

    (Choose your sweetener based on your personal nutritional needs.)

carrot salad ingredients.jpg

Instructions

For the salad:
Stir together the shredded carrots, raisins, diced pineapple, and walnut pieces into a bowl. Set aside.

Mix up the sauce ingredients in a separate container, using a whisk to blend well. Pour the creamy concoction over the bowl with the carrots, raisins, pineapple and walnuts.

Refrigerate for at least 2 hours, or overnight for best taste and blending of all the flavors.

Makes a wonderful, light, FRESH side dish for grilled chicken or fish.

Let me know what you think - did you make this? Chat with me on our Community page on Facebook about carrots, this recipe or any FRESH topic!

I’d love to know how the recipes and tips I share are helping your family enjoy fresh, homemade food!

Fresh Pico De Gallo

Salsa!

These chunky, fresh mixes of healthy vegetables (and sometimes fruit!) are a family favorite around our house, and a no-fail side dish to “spice up” or freshen up any main course!

The first one is an old standby that my family and I never get tired of - my version of Pico de Gallo. A great way to get the kids to eat a serving or two of fresh veggies, and not even realize it! We eat our Pico with multi-grain chips, seed crackers, over fish or meat, in tacos, on salads, or even as a Bruschetta over bread.

Here's how you can make delicious Pico de gallo:

Fresh Pico de Gallo de bess

fresh pico.jpg
  1. Use 4 ripe (make sure they’re really hard!) tomatoes, 1/2 sweet or red onion, 2 limes and a handful of cilantro.

    2. Chop each ingredient, as fine or chunky as you prefer. Squeeze the limes into the mix, and stir it all together in a mixing bowl. Sprinkle sea salt or even a bit of garlic salt, and stir again.

  2. Chill for an hour or two before serving for best taste. You can store for a full day or two in fridge - it only gets better as it sits!

Optional add-ins (get creative and make it to YOUR taste!)

  • Avocado (make sure it’s ripe and firm!)

  • Black beans

  • Jalapeno or another spicy pepper

  • Lemons (some people prefer the taste of lemons to limes and I use it as a swap if that’s what I have on hand!)

  • Parsley instead of cilantro (esp for those who taste soap when eating cilantro)

  • Green onion or chives

  • Cucumbers, deseeded

  • Radishes

Just use the basic Pico salsa recipe as a base, and get creative adding your fave ingredients to the mix! 

BONUS: How to make Tropical Pico

The next salsa is a fruity turn on the original, just dice a firm mango into the original mix, and stir it all together.

Or, add in a bit of minced Jicama for a special tropical crunch! Get as creative as you want, by adding in YOUR fave fruits. 

There you go! 

This tropical pico tops grilled fish and chicken deliciously, or spooned into a fish or shrimp taco, it’s TASTY! It’s an easy to make, everybody’s favorite, fiber-filled side dish!

Get imaginative, get dicing, and get healthy in this fresh way! 

What are some of your favorite salsa combos? 

Post your ideas, and pics of your own simple salsa creations on our community Facebook page!  We want to see your recipe ideas…get ready, get set, post!

Oven Roasted Brussel Sprouts

Ahhh, crispy, salty, crunchy oven-roasted brussel sprouts.

Ever enjoyed Brussel Sprouts crisped to perfection in the oven?

If not, you are missing out!

These yummy green vegetable jewels are far from the slimy or mushy steamed versions we grew up on. I previously steered clear of the little green “baby cabbages” until I found this delicious method. Now, I eat make all the time, and I’ve even convinced half my family to enjoy them with me. My hard-sell picky eaters are still a solid no thanks, though! But I think that has less to do with the way I make them and more that they are mini green things…

Here’s how to make this simple side dish:

broiled sprouts finished.jpg

Where to find them

You can find this nutrient-packed vegetable at any grocer. You’ll need about one handful sprouts for each person you’re feeding (that’s around 3-4 bulbs depending on the size.)

brussels at store.jpg

How to clean them up

Rinse them thoroughly in a big strainer, then remove any “blemished” outer leaves by simply plucking them off. If the outer leaves aren’t bad-looking, but they slip off while you’re prepping the sprouts, keep those to roast, too - they’ll become little “chips” as they get nice and crunchy!

Take a knife and chop off the hard ends (just the edge, don’t want to cut too far into the little head or it will fall a part.)

For this particular recipe, I then slice each head into 3 or 4 thin slices, long-wise. I’ve seen others just half them, OR quarter them into little wedges. Totally up to you and what kind of texture you’re looking for. The bigger the slice or wedge, the crunchier the sprout is.

how to oven roast them

Preheat your oven to 400 degrees.

Prepare a cookie sheet to use. I always put a sheet of aluminum foil over it for easy cleanup after. You could use parchment paper instead, if you’d like.

brussel+sprouts+cooked.jpg

Toss the brussel sprouts in a drizzle of olive oil, grind fresh salt and pepper over them, and spread them evenly on the baking sheet.

Bake for 12-15 minutes (but keep an eye on it for browning, every oven is different and cooks faster than others.) After the initial cooking, I increase the oven temp to 425 degrees and bake another 5 or so minutes to get them truly crispy. Another easy and quick way to crisp them is to broil on high for 2-3 minutes (But keep an eye on them! They’re too easy to burn with broil setting!)


another delicious way to make them…

For a different taste combination, you can make them the same way, but add in a couple slices of bacon (cut into small pieces) prior to baking. Then, a few minutes before they are done in the oven, open it up and and drizzle a bit of balsamic vinegar and maple syrup or honey (just couple tablespoons of each) over them, then toss them together and bake for a few more minutes.

2014-04-11+16.35.04.jpg

This is a completely different taste combo (bitter, savory and sweet) and really takes them up a notch!

2014-04-11 16.16.18.jpg

Well, that’s it friend! I want to know if this recipe helps you make brussel sprouts more often.

Tell me in the comments below or in our FRESH Start Club if this is a side dish you already love or will try!

How to Make Greens 3 Easy Ways

Greens are one of the easiest side dishes you can make for dinner or even easily thrown in with another meal, like with eggs at breakfast.

Today, I’m sharing with you How to Make Greens 3 Easy Ways…

First, let’s clarify what I mean in this post by greens, because obviously there are unlimited varieties of edible greens available! (Lettuce, spinach, cabbage, bok choy, arugula, dandelion greens, and much, much more!)

Here though, I’m focusing in on 3 of the more common greens so that you can be sure to find them locally and affordably:

Mustard Greens
Collard Greens
Kale Greens

greens.jpg

How to Make Mustard Greens

Ingredients

1 bag of pre-chopped greens from store OR 1-2 fresh heads of mustard greens, washed and chopped
Sprinkle Salt
1/2 sweet onion, finely diced
3 garlic cloves, finely minced
1 Tbsp Apple Cider Vinegar
Small amount real bacon bits in bag from store (or cook 3 slices of bacon well, then crumble into bits)
Drizzle olive oil

Instructions

In a medium-sized pot, boil the greens and a sprinkle of salt over high heat for 3 minutes, then drain thoroughly. Put the greens in a strainer, and press them into the strainer with a wooden spoon, to squeeze out any remaining water from the cooked greens.

Meanwhile, saute the sweet onion and garlic in olive oil for 3-5 minutes or so in a pan over medium heat.

Add in the greens and saute for 2 mins on high heat. Once they are finished, drizzle 1 Tbsp apple cider vinegar over the greens and add the bacon bits. Serve immediately.

This is a 10 minute dish, top to bottom - easy to make, affordable to buy the ingredients. And family-friendly - it’s one of my daughters’ favorite side dish!

Here’s the next one:

How to Make Collard Greens

Ingredients

1-2 head of Collard Greens, washed and chopped in thin ribbons (or a full bag of pre-chopped collards from the store)
Olive Oil
3 cloves garlic, minced
1/2 sweet onion, diced
half fresh lemon, squeezed over the greens
Salt & Pepper

greens-made-easy.jpg

Instructions

Heat a large pan on the stove over medium heat and drizzle the olive oil into it once it’s hot. Add the onions and saute them for about 5 minutes. Then add the minced garlic and saute another 2 minutes.

Add in the ribbon-sliced greens (or bag of store-bought) and cook for about 3-4 minutes, or until the greens look jewel-toned.

Squeeze the fresh lemon juice over the greens and stir. Remove from heat and serve immediately.

Under 10 minutes, easy to prepare, and SO delicious, you will want them again and again!


For the 3rd idea and the recipe on how to make easy-peasy Kale Chips, go HERE!


Tell me, do you think these recipes will help you get more green veggies into your eating plan?

Try one or all 3 of ‘em, and then comment below with your results! I’m telling you, you’ll be hooked once you try them!

How to Cook a Spaghetti Squash in the Oven

Naturally sweet and crunchy, spaghetti squash makes a great substitute for the pasta in spaghetti, served with chicken Parmesan or just by itself with a pat of butter melting over it.  It is light, pleasant and nutritious, with many health benefits.  

High in vitamin C, potassium, calcium and magnesium, squash has only 40 calories and 4 grams of sugar in a FULL one cup serving. Packing a punch in the omega-3’s and omega 6’s as well, this underrated natural beauty is a must-eat for health!

Here are the simple steps to cooking a spaghetti squash in your own oven:

coooking spag squash pic 1.jpg

Step 1:  Preheat the oven to 400 degrees. Slice the squash (carefully – the outer shell is hard!) in two pieces, lengthwise.

cooking spag squash pic 2.jpg
cooking spag squash pic 3.jpg

Step 2:  Using a spoon, scrape out all the seeds and pulp in the soft interior of the squash.

Step 3:  Place the two sides face up (or down, it doesn’t really matter) in 1 inch of water in a large baking pan.  Cover the pan and bake for 45 minutes to an hour, or until squash is tender and soft.

 
how to bake a spaghetti squash pic 5.png
 

Step 4:  Once slightly cooled, take a fork, and peel the squash strands, just like spaghetti, off the rinds and into a bowl.  Serve and enjoy!

At our house, we love our spaghetti squash with this healthy homemade spaghetti sauce recipe. The two put together pack a nutritional punch that offers a filling and comforting meal everyone enjoys!

Here’s a how-to video on how to do it:

Was this how-to helpful? Would you like to see more?

Our FRESH Start Club members get helpful how-tos just like this every single month, sometimes even before they're posted here on the blog. Plus new recipes, videos, printables and a warm & friendly support group. If you're ready to find support in your own quest for a healthy lifestyle, GO HERE to learn how you can join us! {Oh and it's FREE!}

Here are some other delicious recipes we think you might enjoy:

How to Make Healthy Turkey Mini-Meatloaves

How to Bake Acorn Squash Rings

Grilling Chicken & Salmon

Baked Maple Acorn Squash Rings

This is an easy-to-make side dish for any time of year, but right now, during the holidays…it’s especially filling and comforting!

I’ve made Acorn Squash as a side dish for my hubby in the past, but just by simply halving the squash and digging out the seeds. Then adding (too much) butter and brown sugar before baking for an hour…so I wanted to find a recipe that is healthier and frankly, easier! This is it!

After reading that boiling or steaming squash actually lessens the vitamin and mineral load, I determined to make it only by baking or broiling in the oven to preserve the wonderful amount of Vitamin A, C & B-6 as well as folate, niacin, potassium, magnesium found in it!

Oh and did ya know that just a 1/2 cup serving (that’s only about 1-2 rings!) is almost 20% of your daily fiber needs? This is such a tasty way to knock out your fiber quota!

Another cool fact - when we combine fibrous vegetables like squash, potatoes (especially sweet!) and a healthy fat like olive oil and then cook them together, it’s actually proven to help the body break down and digest the nutrients more effectively! Super cool, right? Cuz of course it tastes better this way, too!

Here’s How to Make Baked Maple Acorn Squash Rings

acorn squash 3.jpg
 

Ingredients

acorn-squash-938936_640.jpg
  • One medium Acorn Squash (here’s a pic of the whole squash so you can see which one it is!)

  • 2 Tablespoons Olive Oil

  • 2 Tablespoons Pure Maple Syrup

  • Grind or two of Cracked Black Pepper

  • Grind or two of Himalayan Salt


Instructions

  1. Preheat oven to 425 degrees. Place a sheet of aluminum foil over a cookie pan.

  2. Slice the Acorn Squash in 1/2 inch or so thickness, then using a paring knife (or just your fingers) clean off the strings and seeds from the middle. (You can also use a round cookie cutter if that’s easier!)

  3. You should get about 6 slices from a small, 8 from a medium or even up to 10 from a large squash!

  4. Lay the slices on the cookie sheet, then drizzle the oil and maple syrup over each slice. Lightly crack the pepper and grind the salt over each slice.

  5. Pop in the oven for about 25-30 minutes or until nicely done to taste (they should caramelize and brown a bit!)

acorn squash 2.jpg

OK now it’s your turn to try it and tell us what you think!

Can’t wait for you to bake a batch of these for your loves, then come back and tell us how they turned out! Comment below with your experience!

Easy Oven Kale Chips

Kale has returned to the scene as a popular green that is not only full of delicious flavor, but also as an extraordinary source of vitamins A, C and K. These three vitamins are at the top of the list of immune-boosting benefits to our bodies, so this easy-to-prepare green leafy vegetable is a great option for your family's table. 

kale done pic 1.jpg

Aside from its rich nutrient value, Kale is great at boosting your immunity, and health! Eating kale is proven to help cancer prevention, lower cholesterol, reduce the risk of heart disease, promoting compounds for eye health, and more. ALL good reasons to eat more kale!

There's only one disadvantage with eating Kale (besides that it disappears from the plate too quickly!) and that is it can interfere with your body's absorption of calcium. To help prevent this problem, avoid eating calcium-rich foods at the same time. 

Besides eating kale fresh in salads or smoothies or wilted on pasta dishes, these kale chips are a popular way to get enough greens into your family and your own body!

Our friend & healthy lifestyle leader Lolita McNeal shared this easy recipe with our FRESH Start Online Community as a wonderful way to get the satisfaction of a salty crunch into our diet when we are craving chips or other salty no-no's!

LOLITA’S EASY OVEN KALE CHIPS

Here's How To Make Them:

Ingredients:

  • 1-2 heads fresh kale (you can find it in the produce section of your grocery store)

  • 1-2 Tbsp extra virgin olive oil or coconut oil

  • 1/2 tsp salt

Instructions:

  1. Preheat oven to 375-400 degrees. Cut the greens into 2-inch sized pieces. Rub the kale with extra virgin olive oil, evenly coating both sides.

  2. Spread out the pieces evenly on 2 parchment lined baking sheets; season with salt and pepper.

  3. Bake, rotating and switching pans halfway through cooking, until crisp, about 8 minutes.

  4. Optional: Zest lemon over the hot chips.

kale prep pic 1.jpg
 

Lolita shares:

Lolita fitness.jpg


"From my experience, you need very little extra virgin olive oil, the cooking time was closer to 6 minutes than 8, and it's okay if you leave out the lemon zest.  Some other flavor suggestions included with the original recipe were:  bbq rub, sriacha [a type of hot sauce], ranch dip mix, and sesame seeds. 

My family's favorite were the ones I rubbed with a little bbq sauce. If you decide to try the bbq kale chips look for low sugar bbq sauce."


If this recipe was a hit with your family, let us know in the comments below!

Here at FRESH Start, our mission is to share simple steps to better health that the whole family can get on board with - and we want to know how we're doing! Drop a note below and let us know.

Homemade Mac n Cheese

Kids and picky eaters can be tricky to please from our home kitchens, and they don’t always get as excited about nutritious dinners as we moms do! This super-easy homemade mac n cheese side dish will please both mom and picky eaters, and you'll do it in only 15 minutes!

It happens to be a lot of grownup’s favorite side dish too. In our house, we enjoy this side with fish entrees, chicken fingers and meatloaf.  

homemade-mac-n-cheese-pic-1.jpg

How to make it:

Ingredients

  • 1/2 box whole wheat elbow or gluten-free elbow noodles

  • 1/2 cup unsweetened almond milk

  • 2 Tbsp butter

  • 1 T olive oil

  • 4-6 oz shredded cheese

Instructions

1. Saute the uncooked noodles in a drizzle of oil for about 2-3 minutes, stirring to avoid burning them. (This step is optional, and gives the noodles more of a "crispy" texture once cooked, rather than mushy.)

homemade-mac-n-cheese-pic-2.jpg

2. Boil the noodles in several cups of water in medium saucepan over medium heat until just done (takes about 8 minutes.)

3. Drain noodles in strainer, add them back into the saucepan.

homemade-mac-n-cheese-pic-4.jpg

4. Over low heat, stir in shredded cheese, almond milk, butter and olive oil.

5. Continue stirring until just melted, then remove from heat and serve immediately.

homemade-mac-n-cheese-pic-1.jpg

For those of you curious about the other dish pictured here with our Homemade Mac n Cheese recipe...it's Coach Bess's Salmon and Quinoa Patties. Just click here for that recipe!

NOTE: I use this brand of gluten-free noodles for our homemade mac n cheese - in case you were wondering and wanted to try them. They are NOT just "filler food" like so many other pasta options. They are full of nutrition, as you can see on the label! (The protein amount on the label is due to the quinoa used in this brand!)

Oh and they are affordable and easy to find at your regular grocers! 

macaroni pasta gluten free label.jpg

What do you think? Would you try this recipe at home? Let me know in the comments!

Easy, Healthy Vegetable Side Dishes You Can Cook

Do you ever find yourself perusing the fresh foods section of the grocery store, wondering what the heck you’re to do with all those great-looking veggies? 

You know you are supposed to eat more of them, you hear about the benefits to that all the time, but just don’t know how to fix them?

Today, I’m going to give you a few ideas on how to make easy and fast veggie sides for dinner.  No, not the pop-in-the-micro kind!  Those can be a great backup plan, but let’s explore these dishes and let you decide which ones sound truly delicious to you!

Here are a few ideas to try

Greens Made Easy

Cooking greens used to intimidate me, but after a couple practice tries, this dish is now a constant go-to in this house! 

Besides being rich with benefits, like iron, antioxidants, and minerals, collard greens are also very tasty and filling. I even get a couple of the kids to dig into this one!

How to make them:

Ingredients:  

  • 1 head collard greens,

  • half fresh lemon, squeezed over the greens

  • ready-made real bacon bits

  • ¼ sweet onion, diced

  • 4 cloves fresh garlic, minced

  • 2 Tbsp olive oil

Instructions:

  1. Slice up the greens in thin ribbons of about ½ inch thick, and 3-4 inches long, set aside.

  2. Place large sauté pan or wok over medium to high heat, add oil to pan.

  3. Add onions, garlic to hot oil, sauté for about a minute.

  4. Add in the greens and bacon bits, allowing the greens to wilt for about 2 minutes.

  5. Squeeze the fresh lemon over the wilted greens, stir one or two more times, remove from heat. Serve!

Sweet Potato “Fries”

A favorite at our place, and we were so glad to discover that sweet potatoes are a super-food, packed with many healthy benefits! 

Carotene (which is Vitamin A and gives the potato it’s orange color), and minerals like magnesium, potassium, zinc and iron give this great-tasting treat it’s superpower! 

We love it many ways, but the oven-roasted “fries” are a fave of the pickier eaters around our place!

Ingredients:  

  • 1-2 large sweet potatoes, sliced into thin strips (1/4 inch by 2-3 inches)

  • 2 Tbsp olive oil

  • Himalayan pink salt (or ANY salt to your taste)

  • Fresh cracked pepper

Instructions: 

  1. Roll the fries in the olive oil until coated gently

  2. Salt and pepper them, then roast at a high heat (375-425 degrees, depending on your oven) for about 10-15 minutes, or until crispy and done.

    Too easy, too delicious, very healthy as a side dish or snack!

Black Bean & Sweet Corn Salsa

Over time, corn (esp sweet corn!) has gotten a bad rap in the health-eating industry ... but you may be happy to know, it is STILL healthy (as is most every other God-made food!)

Because it is a veggie higher in sugar content, it is better to eat it it in small amounts.  We mainly enjoy corn as one ingredient in a dish instead of the main dish.

Corn contains many health benefits for your body, like lutein (which fights macular degeneration in our eyes!) as well as several vitamins and minerals such as magnesium and phospherous.

Ingredients:

  • 1 cup sweet corn (you can use frozen, just allow it to thaw)

  • 1 can rinsed and drained black beans

  • ¼ sweet onion, diced

  • 2 Tbsp chopped cilantro

  • 2 Tbsp Italian dressing OR 2 fresh limes, squeezed & stirred into mixture

Instructions:

  1. Mix all the ingredients together.

  2. Refrigerate for two hours or more before serving for flavors to mix and blend.

Hopefully you are encouraged now to try these yummy, easy and yes, healthy dishes in your own kitchen. 

Healthy veggies sides can (and should!) be vibrant, easy and enjoyed by the whole family!  Let me know what you think of these helpful ideas in the comments below.

Jicama Slaw

Looking for a healthy side dish for that next gathering (to replace a maybe-not-so-healthy-choice!) or just to add as a filling and tasty side dish to your grilled chicken or fish? 

This beautiful, super-easy side salad is a perfect pairing to any FRESH entree! Try it and then tell us it's not your new favorite!

jicama slaw.jpg

Here's how to make this easy side dish:

Ingredients:

  • 1 Medium Jicama Root, grated with a cheese grater

  • 1/2 finely diced orange, yellow or red bell pepper (or you can use mini-sweet bells, too!)

  • 1/2 de-seeded cucumber, diced finely

  • 1/4 red onion, finely diced (less if it's a strong one! You don't want the flavor to overtake the slaw!)

  • Handful FRESH Cilantro, minced lightly with sharp knife (so as not to bruise it!)

  • 1/2 to 1 large lime, squeezing the juice directly into slaw mixture (to taste)

  • 2/3 of small can of Mandarin Orange Slices, diced (add just 1-2 Tbsp of the juice, but not all of it!)

Instructions:

Stir all the ingredients together, adding or tweaking anything you'd like to your unique taste (such as 1/2 fresh jalapeno, diced, for heat.) 

Refrigerate mixture for about 1-2 hours then stir thoroughly again and serve!

Enjoy as a FRESH and healthy side dish that everyone loves! At potlucks and gatherings around our house, this dish gets wiped clean!

How to Cook Quinoa + Recipes

HAVE YOU HEARD ABOUT THIS NEWEST POWER-GRAIN ON THE MARKET YET?

I had heard of quinoa (pronounced KEEN-WAA) in all the "health food" circles, but had never tried it for myself.  Now, though, I've tried it several different ways, and I LOVE the simplicity of this grain, the numerous and incredible benefits all packed into one tiny seed, and the variety I can use in preparing it! 

Turns out, this tasty super food isn't new at all, as it was enjoyed by the Incas in ancient times, and other native South Americans, where they dubbed it the "mother of all grains!"

One of the reasons I held off in trying quinoa was because of all the fuss in the foodie circles about the "high cost" of it compared to rice and other more common household grains.  I've got a solution for that, too!  With some careful planning and watching, I get quinoa at the neighborhood health food markets for as little as $3 a pound.  You just have to watch for it to go on sale and buy more of it then.  It is usually cheaper sold in bulk, instead of prepackaged.

(Update: Costco is a great place to get it at a lower price in bulk as well!)

HERE'S HOW TO MAKE IT:

Prepare quinoa by boiling 1/2 cup of the grains with 3/4 to 1 cup of water or broth (for extra flavor!)  It only takes about 12 minutes, with the pot covered, and at a soft boil, for the grain to be completely cooked. 

It stays a wonderful slightly crunchy-chewy consistency for even up to a few days after cooking!  I try to cook enough for another meal or two after the first one where I serve it fresh.  It is so tasty leftover, added to a fresh salad as a protein-rich topper.  (One of the top benefits of this grain is the high amount of lean protein found in it - 8 grams in a cup of it!)

Here are two ideas for quinoa recipes you can try for your own family:

ORANGE & ALMOND QUINOA RECIPE

orange & almond quinoa edited.jpg

Ingredients

1 cup cooked quinoa
1 fresh orange (peeled, separated into bite size sections)
handful toasted, sliced almonds
1/4 tsp salt
1/4 tsp ground pepper
 1/2 cup fresh-squeezed orange juice
garnish - sliced green onions

Instructions

Cook quinoa and fluff. Add almonds, orange sections, salt & pepper. Toss together. Squeeze 1/4 cup fresh orange juice over and toss again to coat.

CILANTRO LEMON QUINOA RECIPE

Ingredients

1 cup cooked quinoa
1/2 fresh lemon
handful toasted pine nuts
1/4 - 1/2 cup chopped cilantro

Instructions

Cook quinoa and fluff. Squeeze lemon juice over grain, and stir in pine nuts and cilantro. Toss together with sprinkling of salt and pepper to taste.

These dishes make a wonderful side to fish, chicken or as a vegetarian main dish with steamed or sauteed vegetables on the side.

HERE ARE A FEW MORE RECIPES WE THINK YOU MIGHT ENJOY:

One-Pot Summer Salmon Dinner

Asian-Inspired Grilled Chicken Thighs

Mediterranean Chicken Salad

Quinoa makes such a great part of a healthy (and easy!) dinner meal plan for the week, so use this make-ahead recipe often as a great grain for family meals. To help you create the meal plan a little easier, download these totally free printables from us! Let us know what's on your meal plan this week in the comments below.

Fresh Bean Relish

This FRESH Bean Relish is easy, Delish, and full of natural fiber! 

Our family enjoys this quick dish often with grilled chicken or as a side to fish. 

Hint: It turns out best with all the ingredients rinsed and completely drained, and then refrigerated overnight.  It’s one of those dishes that just gets better with time!

This recipe has helped our family eat more beans, which are rich in fiber and other nutrients for the body.  I personally have never enjoyed beans, but this dish has a way of hiding the “bean taste” in the goodness of the overall dish, and I have enjoyed it often now.

Here’s the recipe:

Fresh Bean Relish

Ingredients

•    1 (15 ounce) can black-eyed peas
•    1 (15 ounce) can black beans, rinsed and drained
•    1½ cups frozen sweet corn, thawed & drained
•    1/2 cup chopped onion
•    1/2 cup chopped green bell pepper
•    1 (4 ounce) can mild green chiles
•    1 (14.5 ounce) can diced tomatoes, drained
•    1 cup Italian-style salad dressing
•    1/2 teaspoon garlic powder

Instructions

1.    In a medium bowl, combine black-eyed peas, black beans, corn, onion, green bell pepper, jalapeno peppers and tomatoes.

2.    Season with Italian-style salad dressing and garlic powder - mix well.

3.    Cover and refrigerate overnight to blend flavors.

If you prefer fresh tomatoes, substitute 1 3/4 cup for the canned diced tomatoes.  For a spicier relish, switch out the mild green chiles for jalapeno peppers, either fresh diced or canned!

Sweet Corn Salsa

This summery salsa is delicious, combining both the sweet bite of the corn and the tangy goodness of the red onion.  It is a simple salsa to serve over fish or alongside a grilled dinner entree.  

Sweet Corn Salsa 

Ingredients

•    1 cup sweet corn (fresh or frozen)
•    1/4 medium red onion
•    1/4 cup chopped cilantro
•    1/2 pint yellow cherry tomatoes (about 3/4 cup)
•    1/2 small jalapeno, finely diced - (Add only if you like heat in your salsa!)
•    1-2 key limes (to taste)

Instructions

1.    Roast sweet corn over medium-high heat in a small fry pan for about 2 minutes, turning often to prevent burning.  (Use teaspoon butter or olive oil to keep from burning.)  Pull corn off the heat and let cool.  
2.    Chop red onion into thin, short slices, adding it to the corn.  Stir in the cilantro, and halve the cherry tomatoes, adding them in to the mix.  Squeeze the lime onto the salsa, then sprinkle sea salt, cracked ground pepper, and a tablespoon olive oil into mix, stir together.  
3.    The natural crunchy sweetness of the corn and tangy addition of the tomatoes and red onion mix beautifully to make a great summer salsa!

Warning:  May be slightly addictive to your family, and you’ll have to make another batch!

Super Simple Tabouleh Recipe

Since sharing this super simple tabouleh, an easy Mediterranean diet staple, with our Fresh Start Coaching Team at our Fall ReFRESHed Conference, there have been tons of requests for this recipe! In fact, several of our coaches were very surprised at how simple this dish is AND how totally delicious it is as a great left-over snack.

Enjoy it with seed crackers or cucumber slices, on sweet potato chips or with warm Naan or Pita bread. It’s a perfect vegan super-fresh protein main dish if you just double the quinoa! This is also a great go-to dish to take to potlucks and get-togethers too. This Tabouleh dish is ALWAYS wiped clean at any gathering!

Super Simple Tabouleh

Ingredients

  • 1 bunch parsley

  • 1/3 Sweet Onion

  • 1-2 Small Tomatoes

  • Olive Oil

  • Onion Powder

  • Garlic Powder

  • 1 FRESH Lemon

  • 1/2 -1 cup Cooked Quinoa (to taste)

Instructions

  1. Chop the parsley fine, dice sweet onions and tomatoes, and stir them all together in medium bowl.

  2. Drizzle olive oil (about 1 Tablespoon) into mix and add a good sprinkle of the seasonings.

  3. Squeeze the lemon juice into the mix, add in the cooked quinoa and stir it all together.

  4. Let the mixture sit in the fridge for at least a couple hours (even overnight is fine!) to allow the flavorings to blend.

  5. Serve with seed crackers, feta cheese and olives for a Mediterranean FRESH snack!

We would LOVE to hear how you like this healthy snack too, so stop by our Facebook Page and let us know what you think of this Super Simple Tabouleh recipe!

What do you love to serve with your Tabouleh? Our favorites are seed crackers and cucumbers but we are always looking for fresh new ideas!