Breakfast

Pumpkin Pie Smoothie

pumpkin smoothie 1.jpg

I couldn’t believe it when I found out: there are so many nutritional benefits to eating or drinking pumpkin!

Keep in mind, I’m talking about real, whole-food, pumpkin - not a PSL from you-know-where. BUT the fun fact is, this humble squash is a gold-mine of healthy fiber, vitamins, minerals and energy-giving, gut-healing goodness!

Even knowing this, our family has never been huge pumpkin fans ( as I know many of you are - YAY!)

So finding this recipe about 10 years ago (and as usual, making a few of our own simple tweaks to perfect it for us) helped us add in this nutritional powerhouse in a more realistic, family-friendly way!

It’s always fun to make during the holidays, of course (traditions and all that) but this delicious, easy smoothie is an smart meal any day of the year! And with the convenience of 100% pure canned pumpkin available year-round, it’s simple to do.

Scroll down after the recipe to see what pumpkin can do nutritionally for your body and health…but for now…

Here’s how to make it:

Pumpkin Pie Smoothie

Ingredients

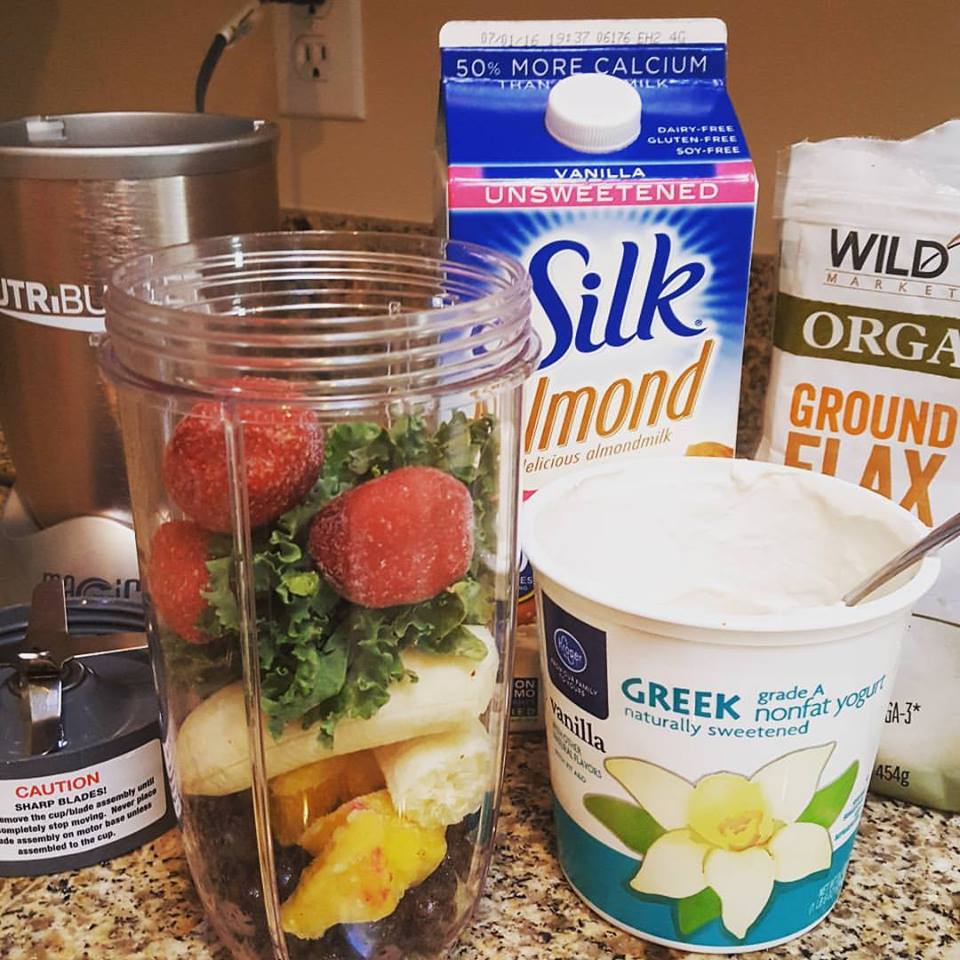
3/4 cup Pumpkin Puree (canned is fine… Just check to make sure it’s 100% pure pumpkin!)

1 frozen or fresh banana

1 cup Almond Milk (or any other plant or nut milk)

2 tsp Pure Maple Syrup (or more, to taste)

1/2 tsp Pure Vanilla Extract

Sprinkle: cinnamon, pumpkin pie spice

1/2 cup Ice

Optional: 1 Tbsp Ground flaxseed or Chia Seeds

We don’t always include the seeds on this particular smoothie, only because pumpkin is already a mild diuretic - and that goes both ways. If you need to go, it’ll help you go, if you need to stop going, it’ll help with that, too!

Instructions

Blend all ingredients together in a blender or bullet for about 2 minutes or until desired smoothness.

Fun tip: We like to squirt a bit of canned whipped cream on ours, and sprinkle a dash of cinnamon on top for that luxurious visual and taste appeal!

Tip: For room temp smoothie (many prefer this in the colder months) just use room temp banana and no or less ice. For that frozen goodness some of us crave all year long, add that frozen banana and a handful of ice.

pumpkin smoothie 2.jpg

After you try this bright orange yumminess at home, be sure and post your pics on our Facebook page FRESH Start for Health!

What pumpkin brings your health…

Vitamins and Minerals:

  • Vitamin K: 49% of the RDI

  • Vitamin C: 19% of the RDI

  • Potassium: 16% of the RDI

  • Copper, manganese and riboflavin: 11% of the RDI

  • Vitamin E: 10% of the RDI

  • Iron: 8% of the RDI

  • Folate: 6% of the RDI

  • Niacin, pantothenic acid, vitamin B6 and thiamin: 5% of the RDI

RDI = Recommended Dietary Intake

This is a fantastic amount of the necessary nutrients your body needs everyday!

Pumpkin is nutrient-dense - lots of nutrition, little bit of calorie load. And it also delivers high fiber (the kind that your body can use to the max - helping your gut heal itself and remove harmful waste!)

It’s high in beta-carotene, a VERY useful antioxidant that we often don’t get enough of. Beta-carotene actively helps our body fight off infection and disease, including viruses, bacterial infections, cancer, diabetes and heart disease!

There’s so much more goodness in this food-jewel than what I can put here. Just promise me you’ll try this smoothie, even if, like me, you haven’t really been a big pumpkin lover before now.

I believe you’ll find yourself going in for that next sip, as surprised as I was, to really like it!

pumpkin smoothie 3.jpg

Protein Energy Bites Snack Recipe

This no-bake, Protein Energy Bites Snack Recipe is just the fix when you need a quick dose of natural energy!

...without a too-much-sugar-penalty to your FRESH eating plan!

It's a go-to favorite in our house for a quick power snack that also satisfies a sweet tooth!

Since it’s made of all 3 vital food groups: protein, fiber, and healthy fats - it is truly a “power combo” food.

These bites are chewy and just barely sweet, but not too much - hubby Juan is the official Protein Energy Bites maker in our house, and he has truly perfected this recipe over the years.

protein bites bowl 3.jpg

These bites are “no bakes”… just one reason why we love this delicious recipe!

It's a flexible recipe, too - if you end up omitting one of the dry ingredients (such as coconut or ground flaxseed) just add in some "extra" of any other dry ingredient is remaining in the recipe (for example, the oats.) If you feel like they come out too dry, add in a drizzle of extra honey or peanut butter. Although it’s also not required to refrigerate this dough, it helps the balls stick together much better. We think they are also tastier if they are a bit chilled!

Protein Energy Bites Snack Recipe

Ingredients

  • 2 cups (dry) old-fashioned oatmeal

  • 1/3 cup unsweetened coconut flakes (to satisfy a sweet tooth, use sweetened)

  • 3/4 cup peanut butter or almond butter (or any other nut butter of your choice)

  • 1/2 cup ground flaxseed

  • swirl of raw honey (about 1/4 cup if you prefer to measure)

  • 1/2 cup pure maple syrup

  • 1 tsp vanilla extract

  • 1 Tablespoon Coconut Oil

  • 1/3 cup MINI chocolate chips (optional)

  • Optional add-ins: sliced or slivered almonds, craisins, raisins, pepitas/pumpkin seeds, sunflower seeds, chia seeds, hemp seeds

    NOTE: anytime you add in more dry ingredients, you need to add a bit of the wet ones, like coconut oil, nut butter or maple syrup to even it out and keep them moldable.

Instructions

  1. Stir all ingredients together in a medium bowl until thoroughly mixed. (You can use disposable gloves, rub a bit of coconut oil on them, so that forming the bites into firm balls is easier.)

  2. Store in a glass container (preferred) or gallon Ziploc or airtight container. You can keep refrigerated for up to 1 week.

  3. Makes about 20 ball-like bites.


Another way to make forming the bites easier: Cover and let the mixture chill in the refrigerator for half an hour before trying to form the ball-like bites. Once chilled, roll into balls of whatever size you would like. (Mine were about 1 1/2" in diameter, to keep portions in check.)

Another Tip: I would caution against substituting agave nectar for the honey, as the honey’s thickness helps hold things together, and as most of you know, I don’t much appreciate agave nectar LOL!

protein bites bowl 2.jpg

After you make these, let us know…

did we hit a home run for a healthier energy-giving sweet snack?

Gluten-Free Banana Nut Muffins (How to Make Them!)

Everybody loves Banana Nut Muffins!

So when I knew I had to go Gluten-free in my foods to help fight my autoimmune disease, I knew I had to test, test, test until I found a Gluten-free flour to keep making my famous Banana Nut Muffins - and keep them deliciously moist and fluffy!

And I found it!

I use Krusteaz Gluten-free flour blend (see pic below) and kept mostly to my original 25+ year banana nut muffin (or bread) recipe to make them.

(Scroll all the way down the post for pics and how-to video!)

Here’s how to make this family favorite:

glutenfreebananamuffins.jpg

Ingredients

1 cup gluten-free flour (I use Krusteaz brand from the grocery store)

1 tsp baking soda

½ tsp salt

½ cup (or 1 stick) unsalted butter, softened

2 eggs, room temperature  

⅓ cup organic sugar (or sugar replacement if you prefer)

½ tsp pure vanilla extract

3 semi-ripe bananas, mashed well (I like to hand-mash them!)

½ cup walnuts, chopped

½ cup mini chocolate chips (optional)

Instructions

  1. Stir together flour, soda and salt in medium bowl, set aside.

  2. Whisk eggs and vanilla in a small bowl, set aside.

  3. Prepare the muffin pan with oil spray or disposable muffin cups while the oven is pre-heating to 350 degrees. 

  4. In another medium bowl, mash the bananas well, then set them aside.

  5. Stir the butter and sugar together until light and fluffy, then set aside.

  6. Combine the egg mix with the sugar and butter mixture, and stir together. Add the bananas, stir. Finally, add the flour mixture a little at a time and stir it all together. 

  7. Place the mixture evenly in the muffin pan, then bake it at 350 degrees for about 20-25 minutes, or until they are done. (When a knife inserted in the middle of a muffin comes out clean, they are done.)

HELPFUL TIPS from video:

  • To soften the butter, pull it out of fridge the night before, or couple hours previous to baking and leave on counter OR heat slightly for a few seconds in the microwave.

  • To bring the eggs to room temp, either pull them out the night before, or couple hours previous to baking and leave in a bowl on counter. Or, for a quick tip: place them in a bowl of slightly warm water, after 20 minutes or so, remove them, they should be room temp.

  • It is important to stir the flour in LAST (after combining the wet ingredients) by spooning just a bit at a time, and stirring it into the batter. It keeps the batter from getting lumpy. Also, don’t over stir the batter, only until ingredients are combined. It will toughen the batter if over stirred.

  • Use mini-chocolate chips instead of regular and only use about 1/3 cup in one batch! It adds a fun stir in for the kids, without adding too much sugar to recipe!


    Enjoy this guilt-free, nutrient-rich treat with your morning coffee or an afternoon cup of tea!


quick video on how to make them:

NOTE! The recipe I’m making in the video is a DOUBLE BATCH! (In case I confuse you with the amounts I talk about!)

 
banana nut muffins in oven.jpg
 
 
The Gluten-free flour that keeps my muffins fluffy, moist and delicious!

The Gluten-free flour that keeps my muffins fluffy, moist and delicious!

What do you think of this recipe? I’d love to know how it turns out for you - especially if you’ve been looking for a Gluten-free flour that keeps your baked goods deliciously moist and fluffy!

Comment here or join the Eat FRESH discussion in our FRESH Start Club (it’s free!)

Healthy Buttermilk Pancakes {Gluten-free}

On my quest to find more wholesome breakfast options, I came across this winner, and now my kids won't let me go too long without making these! 

TIP: They are great if you make a double batch, and stick a few away in a baggie in the freezer for quick school mornings. They re-heat easily in under a minute in the microwave, and my kids swear they taste just as good as the day I made them.

This recipe is originally from Ellie Krieger’s Cookbook, “The Food You Crave,” but I tweaked just a couple things. It is one of my absolute favorites, because it’s not obvious that it’s a healthier pancake.

These days, we replace the whole wheat flour/white flour combo with gluten-free for my special needs. Deliciously, though, the cakes are still fluffy thanks to the buttermilk!

Healthy Whole Wheat & Buttermilk Pancake Recipe

small ww pancake pic.jpg

How To Make It:

Ingredients:

•    3/4 cup whole wheat flour
•    1/2 cup all-purpose flour
(IMPORTANT - for our Gluten-free version, we replace these 2 flours with 1 1/4 cup Krusteaz Gluten-free flour!)
•    1 1/2 tsp baking powder
•    1/2 tsp baking soda
•    1/4 tsp salt
•    2 large eggs
•    1 cup lowfat buttermilk
•    3/4 cup almond milk
•    1 Tbsp honey
•    1/4 tsp vanilla extract
•    Cooking spray or olive oil

Instructions:

  1. Whisk together all the dry ingredients in a large bowl, then set aside. In a medium bowl, beat together the eggs, buttermilk, almond milk, honey, and vanilla.

  2. Place a nonstick skillet or griddle over medium heat, and spray the cooking spray lightly on the surface. Stir the wet ingredients into the dry ones, only long enough to mix them together. Batter may be slightly lumpy.

  3. Ladle the batter into the pan in small amounts, and wait for the cakes to form bubbles on top before flipping them. After about 1 1/2 minutes on each side, or until they are golden brown, remove the cakes from the griddle and serve.

 Tip: I keep it interesting for the kids by adding a tiny amount of mini chocolate chips or blueberries to the batter as the cakes cook up! The kids add protein by dressing the pancakes up with a tablespoon of peanut butter. Then they top them off with just a dollop of low-sugar syrup or a drizzle of pure maple syrup! 

Yummy, healthy, goodness for breakfast! 

Tell me what you think of these after you've made them...I can't wait to hear how they come out for you on our Facebook page!

Egg Frittata Muffin Breakfast Recipe

No other breakfast says “get up and go” like eggs! Providing an unmatched protein value (6 grams of protein in just one) eggs are a great choice for a healthy breakfast.

Whether you’re looking for a wholesome, energy boosting breakfast to send the kids off to school with or a healthy start to the weekend for the whole family, here’s a recipe that will keep them going strong through the entire morning.

pic 1 for Mini Egg Frittata Breakfast Recipe.jpg

Here’s how to make Egg Frittata Muffins

Ingredients

  • 1/3 cup finely chopped sweet or green onion

  • 2/3 cup chopped low-sodium ham

  • 1/3 cup shredded cheese

  • 4 large egg whites

  • 2 large eggs

  • optional: 2 Tbsp diced chives

Instructions

  1. Preheat oven to 350 degrees.

  2. Heat a large nonstick skillet coated with cooking spray over medium-high heat.

  3. Add onion and sauté 2 minutes or until crisp-tender. Add ham, sauté for 3 minutes. Remove from heat, cool mixture for 5 minutes.

  4. Meanwhile, combine remaining ingredients in a large bowl, stir with a whisk.

  5. Add ham mixture, stirring with a whisk.

  6. Spoon mixture into a 12-cup regular size OR 24-miniature muffin cup pan coated with cooking spray.

  7. Bake for 20 minutes or until fully cooked.

Meal Prep Tip: These can be cooked ahead of time in big batches and frozen for quick-reheat on a later day.

Starting your morning with a breakfast high in protein, like this one, can make a huge difference in the rest of your day, giving you lasting energy.

Here are 5 reasons to include the protein powerhouse in your breakfast dishes.

Benefits of Eggs

  • Keeps you feeling full longer

  • Helps you stay energized

  • Builds muscle strength

  • Repairs muscle tissue

  • Prevents muscle loss in older adults

They don’t call it the incredible, edible egg for nothing! ;)

Healthy Cereal Cookies {Gluten-Free!}

Who doesn't love a FRESH new healthy cookie recipe, especially when it's actually got nutrition in it? My kids were so happy when I tested this recipe this past weekend (it's 100% my invention by the way!) and we were all happy when they actually turned out!

Now that gluten is a nemesis to my body's healing from an autoimmune disorder, I avoid it as much as I can...but that doesn't mean I love all things gluten-free - I can't stand how dense many things turn out with a lot of gluten free flours out there.

So this recipe uses a $5 gluten free flour from my neighborhood grocery, nothing too fancy. I bake so rarely now, it's worth the splurge! Try it and see what I mean. No rock-hard recipe here!

Ingredients

ingredients pic healthy cookies.jpg
  • 1 cup gluten-free flour

  • 1/2 cup ground flaxseed

  • 1 tsp baking soda

  • 1 tsp baking powder

  • 1/2 tsp salt

  • 1 tsp ground cinnamon

  • 1 stick butter, softened

  • 1/3 cup coconut oil

  • 1/3 cup white sugar

  • 1/3 cup brown sugar (or 2/3 cup brown sugar and no white)

  • 1/4 cup maple syrup

  • 2 eggs (we use cage-free, grain-fed)

  • 1 tsp pure vanilla extract

  • 4 scoops fruit and veggies powder (like the one pictured)

  • 2 cups bran cereal (fun sub: fruit n yogurt bran cereal!)

Instructions

prep for healthy cookies.jpg
  1. Pre-heat oven to 350 degrees. Place parchment paper on 2 cookie pans.

  2. Combine the dry ingredients (first 6 ingredients listed!) and stir together, then set aside.

  3. Mash the butter, coconut oil, and sugars and syrup together by hand, or use a handheld mixer for ease. Set this bowl aside.

  4. Whip the 2 eggs, adding in the vanilla extract. Add into the bowl with the sugars, butter and oil and stir all wet ingredients together well.

  5. On low speed with the hand mixer (or by hand) slowly add in the dry mixture to the wet ingredients bowl, a little at a time.

  6. Then slowly, add in the fruit and veggie powder and bran flakes until fully mixed.

  7. Drop a Tablespoon of dough on the trays, about 1.5 inches apart to allow for rising.

  8. Bake on 350 degrees for about 10 minutes, check the cookies, if they are browning on edges, they are done! Remove them from oven and let them sit on hot cookie pan for about 2-3 minutes.

  9. Move them to a cookie rack to finish cooling.

  10. Ready to enjoy! You can freeze extras for quick grab snacks for kid's lunches, after-school snack or part of an easy breakfast by serving them with a smoothie or banana!

cookies on rack 3.jpg

If you like, you can always add in nuts, dried fruit or mini-chocolate chips for extra fun or texture. You could also replace the coconut oil with peanut butter, and add in 1/2 cup mini chocolate chips to have a PB and choco snack!

These "cookies" contain enough healthy nutrients to be considered equal to a granola bar! Delicious, nutritious snacks! (This recipe is full of protein, fiber, omega 3 fatty acids, vitamins and minerals...mmmm!)

After you try them, pop back over here and tell us what you think!

Bet your kids/family won't even know they are eating such a great blend of nutrition!

Whole Wheat Banana Bread Recipe

If you love banana bread as much as I do, but worry about if it's good for you, worry no more! It's full of nutrition when it's made right, and I've got the perfect recipe for you that you're entire family will love!

This recipe is made with HALF the sugar, with whole wheat flour, and you can't even taste the difference! If you feel the recipe is too heavy, it may need more moisture to lighten it up a bit.  In this case, use 1 extra banana, or 1/4 cup canola oil, or 1/2 cup unsweetened applesauce. Try this healthier take on a family favorite (this recipe suggests making muffins out of it) and let us know what you think!

Whole Wheat Banana Bread Recipe

banana bread.png

How To Make IT:

Ingredients

•    1 cup whole wheat flour
•    1 tsp baking soda
•    1/2 tsp salt
•    1/2 cup unsalted butter, softened
•    2 eggs
•    1/2 cup sugar
•    1/2 tsp vanilla
•    3 ripe bananas

Instructions

  1. Sift flours, soda and salt in medium bowl, set aside. 
  2. Whisk eggs and vanilla in a small bowl, set aside. 
  3. Prepare a muffin pan OR bread pan while the oven is preheating to 350 degrees.  You can spray the pan with an oil spray, or just use paper muffin cups.
  4. In another medium bowl, mash the bananas well, then set them aside. 
  5. Cream the butter and sugar together until light and fluffy.  Combine the egg mix with the sugar and butter mixture, and stir together. 
  6. Add the bananas, stir. Finally, add the flour mixture and stir it all together.
  7. Place the mixture evenly in a 4-5 mini bread pans OR a full-size pan OR 12-count regular muffin pan. Bake at 350 degrees for about 25-30 minutes, or until they are done.  Yummy!

This recipe makes such a great make-ahead dish, and freezes easily. Just remove from freezer when you're ready to eat. You can either microwave to make them warm again, or just let them thaw to room temp. 

Either way, I guarantee this will be a new family favorite!

What's your favorite quick bread to make for your family? 

How to Make Cha Cha Cha Chiata! {Or Chia Pudding, FRESH Start style!}

So I have to confess...

I really thought all the hoopla about Chia Seeds was maybe just another "health food fad" ... but then I kept reading about the energy that people were getting from this miracle seed! And since that was something I so desperately needed to increase in my life, I decided to give this tiny little seed a chance in my diet! Oh boy, am I glad I did!

Energy increase, anyone?

Yes, Chia Seeds increase your energy, and I'm living proof!

But don't ask me, let's look at the long-time use of this miracle seed in other cultures to see how it works!

  • Chia seeds grow natively in South America, since as early as 3500 B.C.

  • They were eaten by the Aztecs and Mayans and used as energy-sources for them, as well as a property of some medicines!

  • Modern day chia seeds are now grown in other parts of the world, including US and Australia!

  • Only 2 Tablespoons of chia seeds produces 11 grams of fiber, 4 grams of protein and 9 grams of healthy fat!

  • This same amount also gives your body 30% of it's necessary magnesium and manganese (2 minerals we're often deficient in!)

  • 2 Tbsp of these seeds also delivers 18% of your body's daily need for calcium!

Have I convinced you of the powerhouse these little seeds are?

I was convinced! Now to try them for myself...

I wanted to use chia seeds simply - but found that putting them in my smoothie BEFORE blending just created a texture to the whole smoothie that I was not loving! (I'm texture sensitive, so that's a big deal to me! Anyone know what I mean?) So now, sometimes I add into the smoothie AFTER I've blended it up!

My favorite way to get my daily Chia Seeds though, is by making Chia pudding (or in our case, Cha Cha Cha Chiata!)

I've seen plenty of recipes for Chia Pudding, but again, because of my "texture sensitivities" I found that I didn't really enjoy it made  that thick. So I've created one I absolutely love and look forward to "drinking" as a powerful addition to my energy-meals daily!

{We call it "Chiata" because my Latino hubby says this drink reminds him of his "horchata," a popular drink in his culture! Only this "chata" has chia - hence the new name CHIATA!}

jar of chiata.jpg

Here's how to make it FRESH Start style!

Cha Cha Cha Chiata

Ingredients:

  • 1 cup chilled almond or coconut milk (or any other unsweetened plant-based milk)

  • 1.5 to 2 Tbsp Chia Seeds (if you want thicker consistency, add a little more)

  • 1/4 tsp pure vanilla extract (or just eye it and drizzle)

  • 1/2 tsp pure maple syrup (try it first without and only add if you need extra sweetness)

  • quick shake of ground cinnamon

Instructions:

  1. Using a small mason jar, shake all ingredients together for a minute or two. Then place in fridge and enjoy within a few minutes or hours later.

  2. The chia seeds will swell up, absorbing the liquid and become easily ingested either by using a spoon or drinking straight from the jar.

I dare you to replace one of your current choices for energy drink in the morning or afternoon with this delicious chiata from ingredients you can find anywhere! You'll never miss the ups and downs of the other drink, but will truly enjoy the steady, ongoing energy you get from this drink!

Did you like this recipe? Get plenty more right here!

Then let us know how YOU make YOUR Chiata in the comments below!

Sweet Green Smoothie Recipe

This smoothie recipe is close to my heart as a crunchy mama, because it's the first smoothie recipe I could get my uber-picky 9-year-old daughter (now 17 and still loving them!) to eat and actually enjoy.  She swears by it to all her friends now, and loves the fact that she is getting a serving of veggie in every glass (but can’t taste it!)

Here’s how to make it:

Ingredients

  • 1 to 1.5 cups baby spinach

  • 1/2 cup unsweetened almond milk

  • 5-6 ice cubes

  • 3 ounces low-sugar Vanilla Greek yogurt (1/2 small container)

  • 1/2 green apple, peeled and cored

  • 1/2 banana

  • 1/4 cup water (or to taste)

  • Drizzle of honey (if needed for sweetness)

Instructions

Place all the ingredients in a blender and blend them on high until smooth (usually about 1-2 full minutes in a regular blender). Serve with a dollop of canned whipped cream on top for a fun extra to this healthy and nutritious smoothie!

Easy to make, no added sugar, and protein-rich for a quick, healthy breakfast option.  You just can’t go wrong with this family-friendly smoothie recipe!  

Weight loss tip: Drink down 8-12 ounces of this smoothie at mealtime for a fabulous weight loss meal replacement that keeps you feeling satisfied.

Got picky eaters in your house like me? Try this healthy green smoothie with them, then let us know...did they like it? You can post here in the comments or over in our free FRESH Start Online Community on Facebook.

If you liked this recipe, we think you'll enjoy these as well:

Berry Nutty Smoothie (Our signature smoothie)

Healthy Homemade Pizza

Easy (and Healthy!) Homemade Granola Recipe

Make this easy (and healthy!) homemade granola recipe to have breakfast cereal on hand and ready to eat for busy mornings! As a kid, I spent half my childhood on a farm in the mid-west, so good wholesome food was always available! We drank fresh goat's milk, plucked our own fresh eggs from the coop every morning, and ate fresh, home-grown vegetables from our quarter-acre garden. For years, my mom would make our own homemade cereal, too. A delightful sweet and crunchy concoction from our backyard walnut tree's harvest, old-fashioned oats, and other delicious grains.

So developing this recipe was a real treat, taking me back a few years. The warm cinnamon smell as it roasts brings the comfort of homemade goodness back, and my kids now get to experience a peek of the farm life right here in our suburbia kitchen!

You can make this recipe too, it's easy, low-sugar and keeps well if you freeze in a ziploc, or place it in an airtight container. (Glass jars are best!)

Loaded with magnesium and potassium, this easy granola is a high-fiber quick choice for breakfast! Choose this granola over commercial cereals, which are mostly sugar-laden and sometimes lacking real nutritional load per serving.

Homemade Granola Recipe

Ingredients

  • 6 cups old-fashioned rolled oats
  • 1 cup chopped or sliced almonds
  • 1/2 cup chopped walnuts
  • 1/2 cup sunflower or pumpkin seeds
  • 1/4 cup pure maple syrup
  • 4 Tbsp coconut oil (OR 5-6 Tbsp alternate plant oil)
  • 1/4 cup honey
  • 1 tsp ground cinnamon
  • 1 tsp vanilla extract

Instructions

  1. Preheat oven to 300 degrees F.
     
  2. Line 2 large baking sheets with parchment paper.
     
  3. Combine the first four ingredients in a large bowl. Mix the last six ingredients in a medium bowl until completely blended. Pour the liquid over the dry mixture, and toss together until coated. Spread the mixture into the baking pans.
     
  4. Bake on the lowest rack, stirring every 15 minutes or so, for about 30-45 minutes or until evenly browned and crispy. Let the mix cool completely in the pan before serving or storing in airtight container.

Ta-da!  That's it! 

A few minutes to stir, a few more to bake, then let it cool - and you have several quick breakfasts ready to pull out for those busy school mornings. 

How to enjoy this granola:

  • Add a sliced banana or some fresh berries to the top, and pour cold unsweetened almond, coconut or soy milk over it!  
  • Heap spoonfuls of it over a few ounces of low-sugar Greek Yogurt , and add fresh fruit or berries to make a "parfait."
  • Place a half cup or so in a small bag or container to enjoy plain, as a "snack" for energy between meals.

If you enjoyed this recipe, check out more breakfast ideas here. Then let us know in the comments how you eat your granola!

Berry Nutty Smoothie

I have discovered how to have real, lasting (non-crash-and-burn) ENERGY in the morning - and it's with my Berry Nutty Smoothie! 

This smoothie is full of vitamin, mineral and energy-increasing benefits! It is the answer for morning POWER...raise your hand if that sounds like something you could use!

It’s like drinking your vitamins every morning! 

Only takes about 3-5 minutes to whip up and enjoy...oh, and even my picky kids love it!

Smoothies have been around a long time,

so this idea of a liquid breakfast is nothing new.  There are many variations of healthy shakes - many brands, powders, and formulas to choose from out there. But so many of those are loaded with sugar, additives, coloring, etc...why not go FRESH instead? It's too easy! Like so many of my busy-bee clients, I used to struggle with getting a good breakfast eaten before the busy day started...so this easy, quick smoothie has solved that problem!

Are you ready for more energy in your mornings without the “help” of sugar or caffeine? 

Here you go!

Berry Nutty Smoothie

Ingredients

smoothie step 1.jpg
  • 1/2 cup plain or low-sugar Greek yogurt

  • 1 cup unsweetened almond, coconut, rice, or soy milk

  • 1 Tbsp ground flaxseed (start with less for first couple smoothies)

  • 1/2 cup fresh or frozen berries such as strawberries, cherries, or blueberries

  • 1 banana for creamier, sweeter smoothie

  • 1 Tbsp Coconut Oil or other Nut Butter

  • 1/2 cup water (I use Coconut water to get even more energy-giving benefits!)

  • 1-2 handfuls FRESH baby spinach or kale

  • 5-6 cubes ICE (If berries aren’t frozen)

Instructions

  1. Blend at high speed until ingredients are smooth. (Add water or milk as needed to achieve desired consistency!)

  2. Makes 2 – 3 medium smoothies

This snack also makes a great meal replacement, afternoon snack, or dessert when that sweet tooth starts calling!  FULL of protein, natural energy and detoxifying ingredients, this smoothie is more than a non-guilty pleasure - it's GREAT for your health!

About add-ins:

Here is a pic of my fave add in for energy and to help heal my deficiencies caused by a severe autoimmune disease. I get it at Walmart for $13!

There’s so many add-in ideas to use, and for you, it should be about what you’re trying to accomplish through your smoothie!

What I mean is, use the goals you have for your health to determine what you should put in your smoothie:

  • Are you looking to tackle gut healing? Use a bone broth powder or collagen!

  • Need energy, brain clarity or to increase your strength? Add in the one I show you above, OR another protein powder, or even an energy-giving powder, like moringa!

  • Looking to fill up on this smoothie, eat less and promote weight loss? Make sure what you add in gives this a protein boost!

smoothie Jov.jpg

This recipe has been kid-approved for years now and my kids honestly ask for it when I get lazy about making it.

Our systems just work better on it! We poop “right,” we have more energy, we keep our weight where we want it, we just FEEL BETTER!

Are smoothies new to you? Or something you've been including in your healthy habits all along? Would love to hear from you in the comments below!

Here’s a quick video on how to make it!